Tuesday, 19 December 2017

DCC in T??? MADNESS!!!


The guys at TGauge.com continue to do ever more crazy stuff in this scale!

https://youtu.be/2HtKo9vsrtc

Wednesday, 20 September 2017

New T-Gauge fencing from Tgauge.com

The great folks at Tgauge.com recently held a giveaway on the Facebook group for the new etched brass fences that they've brought out. Well, I entered and won one! Awesome! It arrived today in the post.

The brass sheet features a variety of different fence types and sizes and accompanying gates. All told, there's 600m of fencing on this one etched sheet.


Wednesday, 22 February 2017

Possibly the smallest working level crossing in the world!


I made my level crossing functional using a OO level crossing motor set from www.heathcote-electronics.co.uk. Welding wire was bent to shape to attach the gates to the servos, and with the help of a lot of swearing and patience I got it all to work. Zoomed in camera is a little unkind to T gauge sometimes and this feels a bit like that now. My painting of the gates isn't that great and they both snapped at one point so the joins aren't perfect with superglue. Also, apologies for the vertical camera, it was the only way I could get my phone into the right position.

Monday, 30 January 2017

GWR Castle Class Steam Loco in T Gauge - part 1

I like a challenge and today my challenge is to add a steam loco with rods etc. to my rolling stock, in T gauge...

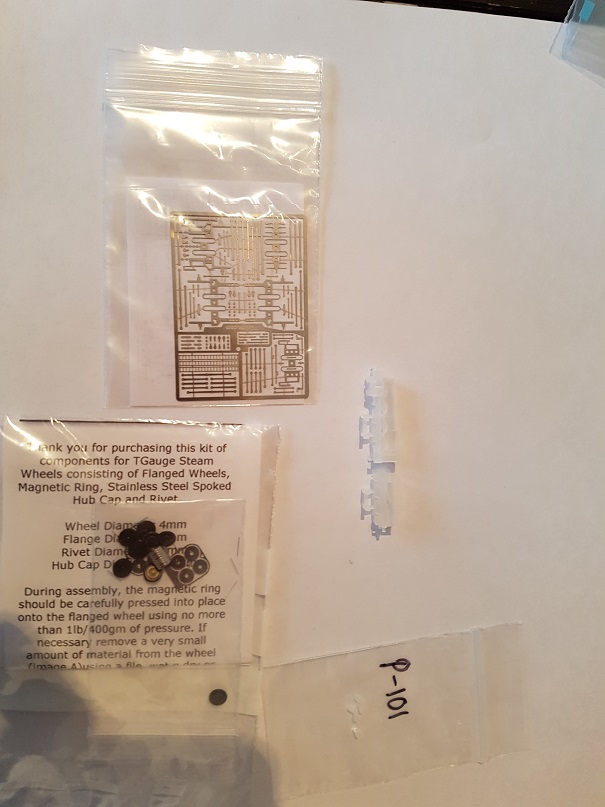
I have the GWR Castle class 3d printed from Shapeways, the new loco wheels and etched set of rods from Tgauge.com and some determination.

I didn't realise how tiny the bits would be till they arrived in the post.

The assembly of the wheels was much harder than I thought it would be. I thought they would just slot into the axles and job done. It wasn't that simple, after some trial and error and swearing, I eventually worked out a method that works (kind of). I filed the pointy bit on the back of the wheel that slots into the axle to a sharper pointy bit and that helped slot it together with some brute force. The magnetic tyres and the etched facias went on without any problems though. Just needed a bit of super glue.


Next stage was wheels onto body. The back to back width between the wheels was tighter than the width given on the loco chassis and much filing and trimming was done to make them fit (very very carefully with an electric drill with a rotary file). I'm still not sure they will be particularly free running when its finished.


The tender wheels fit fine using the normal T gauge coach bogie wheels. But there doesn't seem to be any way of securing it all. I had to file the area down and screw on a bogie and a half and it still looks ok. The bonus of using the bogie is that it solved the problem of attaching the coupling.

The tender was fitted with a loop made of wire to attach it to the main loco, much like in a normal OO model loco with a loop and pin type attachment.

Then I painted it, that was the easiest part.

OO gauge castle class behind it for scale.
 Now I'm just waiting for some 0.2mm drill bits to arrive in the post so I can do the rod work.

Saturday, 22 October 2016

T Gauge BR class 25 with Mk1 Coaches video


Just finished painting my 4 coach set of Mk 1 coaches and class 25 diesel for the Wimbledon Model Railway exhibition next weekend.

Friday, 21 October 2016

Class 25 diesel and mk1 coaches


Working on some new rolling stock with bodies from shapeways. The coach in the background is N gauge for size comparison. 

Tuesday, 15 March 2016

Runner up at the East Anglia Model Railway Exhibition in Huntingdon!

Last weekend was the St. Neots Model Railway Club's exhibition in Huntingdon/Godmanchester and I took along my guitar case. The layout gathered lots of attention from all ages, particularly because of my 'Eyesight Test' for the layout where people had to find 10 people etc. on the layout. Lots of people from 5 year olds to battle hardened railway exhibitors had a go at it, most managing to find all the tiny details.

I was very surprised when after the Mayor of Huntingdon had awarded the Best in Show award to the amazing 2mm finescale layout "Fence Houses", he came over to my layout with his entourage and said that if he could have given out an award for second place I would have got it. I was and still am flabbergasted. Thank you Mr. Mayor!


Saturday, 5 March 2016

T gauge Tardis/police box

I've added 2 police boxes to my layout, 1 obvious and one hidden in trees. The police box is available from NeilMachin's shop on shapeways.com here.


Thursday, 12 November 2015

Czech T-Gauge Diorama

After a look on the web today to see if there is anything new going on in the T gauge community I found this interesting blog in Czech. Unfortunately he has made his little diorama and found that T isn't the thing for him at the moment, which is a shame because he's done a really nice job.

See his blog here or translated here.

A couple of pics from his blog.


Wednesday, 25 March 2015

LED Street lighting

I found recently on eBay someone selling 1:500 scale LED street lighting. It was direct from China so the price was super cheap. I thought I'd order some, well 30 of them, only £15 with free P+P!!! They arrived today and I have now installed 13 of them so far and I have to say I am very impressed. The only issues were that the angle of the street lights needed a bit of adjustment and they needed painting as the lamp covers are made of copper and it would look a bit weird leaving them as is. They run on 3v, so I nipped into poindland to grab whatever item used 2 AA or AAA batteries and nabbed it to get the battery housing out of it. Would've gone to Maplin but it was cheaper to walk to poundland than go all the way to Maplin just for a battery holder. After lots of soldering, its now done. Maybe at some point I'll work out how to hook it up to the USB 5v power supply already in the case and add a switch to it and maybe a variable power knob to make them a bit dimmer.

The lights as they come. Much closer to 1:400 scale than the 1:500 scale they're supposed to be.

Lights painted grey


Maybe they need dimming for exhibitions as they're not very photogenic at the moment

Friday, 13 March 2015

Pics from the Milton Keynes Exhibition and a new train added to my fleet

The layout and I attended the Milton Keynes Model Railway exhibition on the 14th of Feb. Nearly 3000 people came and it was very busy. I didn't even get a chance to see the 2nd hall. The day went well and there were plenty of people surprised and baffled by seeing T Gauge. Thank you MKMRS for inviting me. Doug Kightley, the bossman of the T Gauge forum joined me to help out and he brought down some of his Firth of Forth bridge project to show off too. The bits that he brought were very impressive.

We were in the Cafe area overlooking the main hall. Doug was busy assembling his bridge section
The view
The intended rolling stock for the day. Unfortunately the Network South East train decided to break on me and had to be replaced. The new DMU did great though.
The new DMU to my fleet. painted the day before the exhibition lol. Its a BR class 108 3d printed by shapeways . Exactly the sort of thing that used to go past my house on the Bedford to Bletchley Line.

A Section of Doug's Forth Bridge project.
And here's a video of the event, featuring Stratfield at the end :D


Sunday, 1 February 2015

Painting Rusty Rails in T gauge


I've had a kick up the bum to do something to my layout as I've found out that I'm doing and exhibition in 2 weeks time apparently Aaaaahhhhhh!!!

I had started painting the rust on the rails but had only done about a third of the layout. Having this unfinished would look a bit naff, so I have to paint the rest now pronto. 

I'm using a size 0 brush with Humbrol Acrylic rust colour. The results are quite pleasing I think. The track was painted with grey and dark ink a long time ago.


The difference between unpainted and painted track.

Thursday, 9 October 2014

New T Gauge Technical Details and FAQ pages on the blog.

I have added 2 new pages to the blog with information taken from the defunct T-Gauge.net website. The Technical details and FAQ pages have links to them under the main title at the top of this page.

Also, here is a pic of the cake my Mother made for my birthday. Look familiar?


Wednesday, 17 September 2014

Adding a backscene has made a big difference

I decided I didn't like the black background of the guitar case and decided the best way to fix this was with a backscene. Normally I'm quite dismissive of the concept because its very easy to have a background that doesn't fit very well. Either because of different colours, features not lining up, wrong style or just generally not feeling right. So I was a bit wary that I was going to make the layout look worse.

To my knowledge you can't buy printed backscenes in T scale. So my plan was to find a free one on the internet and scale it down until it looked right and print it off myself. My initial backscene sort of looked ok but it just didn't feel right. It had a river and a city centre with lots of buildings. So I went searching again and found another and printed that. I am very pleased with the outcome. It has greenery in the perfect spots for where my hills begin either side, its not distracting and the buildings fit very well with with my buildings directly in front of it. The only downside is there is a gravestone on the foreground which looks enormous to scale, so I'll have to hide it with trees or something. Either was I'm very happy with the result, it lightens the layout up nicely and gives a sense of depth.


Thursday, 11 September 2014

The layout has had its first outing to an exhibition! The Silverfox DCC club exhibition in Milton Keynes

It was a bit of a last minute thing but I volunteered to take my guitar case to the exhibition about 2 weeks before it was due to happen and they managed to squeeze me in. So on the 16th of August I arrived for my first exhibition that I have exhibited at since I was about 17 (quite a few years ago). I was overwhelmed with the response. It was very popular. After working on it so long and being used to the tinyness its easy to forget how unusual it is. Because of the response, I have been reinvigorated to work on it further and I have plans for things to improve it (and I want more stock to run on it now lol).


Monday, 10 March 2014

The layout is now called Stratfield - and here's a video of it


The name Stratfield is a mixture of Strat (the guitar name) and Cranfield (a village where I grew up).

Wednesday, 27 November 2013

The Layout is effectively FINISHED!!!!! Hurray!!

I've glued the final flock, trees and random fluff and the layout is now effectively finished! It took nearly a year (which was 99% procrastination on the project). I have learnt much about working with such small models. The idea seemed so easy in the beginning, it turned out to be a bit more of an effort. Mostly due to frustration with dealing with such small stuff, there's a sheep somewhere on my floor that I'll never find.

While I say its effectively finished, I do intend to carry on with small bits and bobs, like adding more cars and people and other finishing touches.

Without further ado, the interesting bit of the blog post, the pics:


Friday, 22 November 2013

List of T Gauge suppliers

I've made a page on the blog that lists the T Gauge suppliers I've found. There's a new bar at the top of the page with a link to the new Useful T Gauge Info page.